Bin
BIN文件是纯二进制文件,没有固定的结构或元数据。==当想要将二进制文件烧录进单片机时,不需要再对数据进行处理==,也就是说,我们使用ImHex
Hex
Hex 全称 (Intel HEX)文件是由一行行符合Intel HEX文件格式的文本所构成的ASCII文本文件。
在Intel HEX文件中,每一行包含一个HEX记录。
[!note]
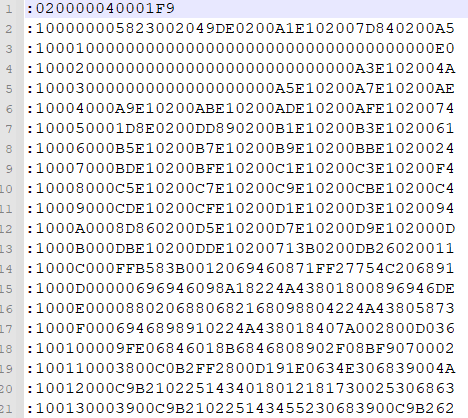
注意:我们使用txt文件打开的时候显示的是ASCII表示,也就是一个字符串。实际上一行数据的原始数据如下图左侧所示,使用txt打开的如右图所示。
下面会用源数据表示左侧的数据,用ASCII表示右侧数据。
参考链接
单片机烧录用的hex文件,文件格式解析(转载)_.hex用什么软件打开-CSDN博客
Intel Hex Format
行结构
一行Hex数据由以下结构组成:
1 [Start code][Byte count][Address][Record type][Data][Checksum]
参数
长度
说明
Start code
-
每行都由冒号开头,这是固定的
Byte count
1 字节
本行数据的长度,最大值是255 (0xFF). 16 (0x10) 和32 (0x20)是最常用的
Address
2字节
Memory数据开始16-bit地址偏移。物理地址通常是有这个偏移加上基地址
Record type
1 字节
表示不同数据段的含义
Data
可变长度
具体数据 N Byte ,表示本行中数据字节的数量
Checksum
1 字节
校验值
[!tip]
Checksum的计算方法为:
如0300300002337A1E,数据和为:03 + 00 + 30 + 00 + 02 + 33 + 7A = E2 这个E2的补码是 1E ,即这个数据record的补码
[!note]
注意:上表的长度是ASCII的长度,也就是假设txt显示:1010,那么10就是一个字节,但是在源数据中,这就是两个字节0x31 0x30
==Record type的选取==
数值 数据类型详(Record type)
00表示后面记录的是数据
01表示文件结束,放在文件的最后,标识HEX文件的结尾
02表示扩展段地址
03表示开始段地址
04表示扩展线性地址
05表示开始线性地址
[!important]
这里需要注意的是Bin文件和Hex文件的区别:
Bin文件中的数据内容可以直接烧录进入Flash中
Hex文件中的数据内容(指的是源数据)是经过改变之后才可以放入Flash中的
一般我们通过txt文件看到的都是ASCII表示,并不是文件源数据,我们需要将ASCII的数据当成16进制的数据,也就是我们看见的:1010转换为0x10 0x10。此时他们的源数据就改变了。源数据从0x3A 0x31 0x30 0x31 0x30变成0x10 0x10 0x10 0x10
地址解读
因为HEX的地址段只有两个字节表示,只能寻址到16位,显然是不够的,所以就有了拓展地址,相关解释请参考Intel Hex Format 。
地址分为16位和32位或8位。
8位和32位:==数据记录中的数据字节在内存中的绝对地址为线性地址==。
16位:==数据字节的绝对地址是分段地址==。
==拓展地址空间==
地址类型
Record type
地址解读
线性基地址
0x04得到的数据左移16位
段基地址
0x02得到的数据左移4位
偏移地址
0x00得到的数据
[!tip]
选择不同类型的基地址(0x02和0x04)对应着不同位长的系统。
==指定程序入口==
开始段入口:
地址类型
Record type
地址解读
代码段地址(CS)
0x03得到的数据的高2字节
指令指针地址(IP)
0x03得到的数据的低2字节
记录::0400000300003800C1
数据字段:00003800。
CS = 0x0000。
IP = 0x3800。
实际入口地址 = (0x0000 << 4) + 0x3800 = 0x03800。
开始线性入口:可以直接使用数据字段的值。
记录::04000005000000CD2A
数据字段:000000CD。
实际入口地址 = 0x000000CD。
==示例==
以下是一个包含扩展地址记录的HEX文件示例:
复制
1
2
3
4
:020000021200EA :10000000AABBCCDDEEFF00112233445566778899F1 :10001000ABCDEF0123456789ABCDEF0123456789B2 :00000001FF
第一行(类型02):
数据字段:1200(段地址)。
基地址 = 0x1200 << 4 = 0x12000。
第二行(类型00):
偏移地址:0000。
实际地址 = 0x12000 + 0x0000 = 0x12000。
数据字段:AABBCCDDEEFF00112233445566778899。
第三行(类型00):
偏移地址:0010。
实际地址 = 0x12000 + 0x0010 = 0x12010。
数据字段:ABCDEF0123456789ABCDEF0123456789。
第四行(类型01):
实现
以下使用CAPL语言实现:
1
2
3
4
5
6
7
8
9
10
11
12
13
14
15
16
17
18
19
20
21
22
23
24
25
26
27
28
29
30
31
32
33
34
35
36
37
38
39
40
41
42
43
44
45
46
47
48
49
50
51
52
53
54
55
56
57
58
59
60
61
62
63
64
65
66
67
68
69
70
71
72
73
74
75
76
77
78
79
80
81
82
83
84
85
86
87
88
89
90
91
92
93
94
95
96
97
98
99
100
101
102
103
104
105
106
107
108
109
110
111
112
113
114
115
116
117
118
119
120
121
122
123
124
125
126
127
128
129
130
131
132
133
134
variables { struct Block { dword BlockStartAddr; dword BlockDataLength; byte dataBuffer[0x020FFFF ]; }; struct Block hexfile [5]; int HexBlockTotalNumber = 0 ; dword t1; } byte char2byte (char ch) { byte val; val = 0 ; if ( ch >= '0' && ch <= '9' ) { val = ch - '0' ; } if ( ch >= 'a' && ch <= 'f' ) { val = (ch - 'a' ) + 10 ; } if ( ch >= 'A' && ch <= 'F' ) { val = (ch - 'A' ) + 10 ; } return val; } void Read_hexFile (char Filename[]) { long file_handle; char RowData[128 ]; dword i; dword RowDataByte; qword OffsetAddress; qword ReAddr; dword Len; dword ReLen; dword Addr; dword Type; RowDataByte = 0 ;i = 0 ;Len = 0 ;ReLen = 0 ;Addr=0 ;Type = 0 ;ReAddr = 0 ; file_handle = OpenFileRead(Filename,0 ); HexBlockTotalNumber = 0 ; if (file_handle!=0 ) { while ( fileGetStringSZ(RowData,elcount(RowData),file_handle)!=0 ){ if (RowData[0 ] == ':' ){ Len = (char2byte(RowData[1 ])*0x10 +char2byte(RowData[2 ])); Addr = char2byte(RowData[3 ])*0x1000 +char2byte(RowData[4 ])*0x100 +char2byte(RowData[5 ])*0x10 +char2byte(RowData[6 ]); Addr |= (OffsetAddress << 16 ); Type = char2byte(RowData[7 ])*0x10 +char2byte(RowData[8 ]); switch (Type){ case 0x00 : if (Addr > (ReLen + ReAddr)){ if (RowDataByte == 0 ) { hexfile[HexBlockTotalNumber].BlockStartAddr = Addr; } else { hexfile[HexBlockTotalNumber].BlockDataLength = RowDataByte; RowDataByte = 0 ; hexfile[HexBlockTotalNumber].BlockStartAddr = Addr; HexBlockTotalNumber++; } } for (i = 0 ; i< Len ; i++) { hexfile[HexBlockTotalNumber].dataBuffer[RowDataByte++]=(char2byte(RowData[2 *i+9 ])*0x10 +char2byte(RowData[2 *i+10 ])); } ReAddr = Addr; ReLen = Len; break ; case 0x04 : OffsetAddress = char2byte(RowData[9 ])*0x1000 +char2byte(RowData[10 ])*0x100 +char2byte(RowData[11 ])*0x10 +char2byte(RowData[12 ]); break ; case 0x01 : hexfile[HexBlockTotalNumber].BlockDataLength = RowDataByte; HexBlockTotalNumber++; break ; } } } write("Hex文件读取成功, 数据分块:%d" ,HexBlockTotalNumber); for (i = 0 ; i < HexBlockTotalNumber; i++) { write("数据块:%d, 起始地址:0x%X, 结束地址:0x%X, 数据长度:%6d字节\r\n" , i+1 , hexfile[i].BlockStartAddr, hexfile[i].BlockStartAddr + hexfile[i].BlockDataLength - 1 , hexfile[i].BlockDataLength); } fileClose(file_handle); } else { write("OpenFileRead,error occurs" ); } } on key 'f' { t1 = timeNow(); Read_hexFile("test.hex" ); write("%d" ,t1-timeNow()); write(hexfile[0 ].dataBuffer); } write (byte v[]) { int i; for (i=0 ; i<48 ; i++) write("dataBuffer:%x" ,hexfile[0 ].dataBuffer[i]); }
Elf
ELF(Executable and Linkable Format,可执行与可链接格式)是一种用于可执行文件、目标文件、共享库和核心转储的标准文件格式。它广泛应用于类Unix系统(如Linux、BSD)以及嵌入式系统中。
ELF文件的结构
ELF文件由以下几个主要部分组成:
ELF头
程序头表
节头表
段和节
作用 :描述文件的基本信息,如文件类型、目标架构、程序入口地址等。重要字段 :
e_ident:魔数(Magic Number),标识文件为ELF格式。e_type:文件类型(如可执行文件、共享库等)。e_machine:目标架构(如x86、ARM)。e_entry:程序入口地址。e_phoff:程序头表偏移。e_shoff:节头表偏移。
作用 :描述段(Segment)信息,用于加载可执行文件。重要字段 :
p_type:段类型(如可加载段、动态链接信息)。p_offset:段在文件中的偏移。p_vaddr:段在内存中的虚拟地址。p_filesz:段在文件中的大小。p_memsz:段在内存中的大小。
作用 :描述节(Section)信息,用于链接和调试。重要字段 :
sh_name:节名称(在字符串表中的索引)。sh_type:节类型(如代码节、数据节)。sh_addr:节在内存中的地址。sh_offset:节在文件中的偏移。sh_size:节的大小。
段(Segments)和节(Sections)
段 :用于加载和执行,通常包含代码、数据等。节 :用于链接和调试,通常包含符号表、字符串表等。
ELF文件的类型
ELF文件可以分为以下几种类型:
可执行文件(Executable) :可以直接运行的程序。共享库(Shared Library) :动态链接库(如.so文件)。目标文件(Relocatable File) :编译生成的中间文件(如.o文件)。核心转储(Core Dump) :程序崩溃时的内存转储。
ELF文件的工具
以下工具可以用于分析和操作ELF文件:
readelf :查看ELF文件的详细信息。
示例:readelf -h <file>(查看ELF头)。
objdump :反汇编和查看ELF文件内容。
示例:objdump -d <file>(反汇编代码段)。
nm :查看ELF文件的符号表。
strip :删除ELF文件的符号表和调试信息。
ELF文件的加载和执行 当ELF可执行文件被加载到内存中时,操作系统会执行以下步骤:
解析ELF头,确定文件类型和入口地址。
根据程序头表,将段加载到内存中。
设置程序的堆栈和环境变量。
跳转到入口地址,开始执行程序。
ELF文件的示例解析
以下是一个简单的ELF文件解析示例:
查看ELF头
输出示例:
1
2
3
4
5
6
7
8
9
10
11
12
13
14
15
16
17
18
19
20
ELF Header: Magic: 7f 45 4c 46 02 01 01 00 00 00 00 00 00 00 00 00 Class: ELF64 Data: 2's complement, little endian Version: 1 (current) OS/ABI: UNIX - System V ABI Version: 0 Type: EXEC (Executable file) Machine: Advanced Micro Devices X86-64 Version: 0x1 Entry point address: 0x400430 Start of program headers: 64 (bytes into file) Start of section headers: 6936 (bytes into file) Flags: 0x0 Size of this header: 64 (bytes) Size of program headers: 56 (bytes) Number of program headers: 9 Size of section headers: 64 (bytes) Number of section headers: 31 Section header string table index: 28
查看程序头表
输出示例:
1
2
3
4
5
6
7
8
9
10
11
12
Elf file type is EXEC (Executable file) Entry point 0x400430 There are 9 program headers, starting at offset 64 Program Headers: Type Offset VirtAddr PhysAddr FileSiz MemSiz Flags Align LOAD 0x0000000000000000 0x0000000000400000 0x0000000000400000 0x00000000000006fc 0x00000000000006fc R E 200000 LOAD 0x0000000000000700 0x0000000000600700 0x0000000000600700 0x0000000000000230 0x0000000000000238 RW 200000 ...
查看节头表
输出示例:
1
2
3
4
5
6
7
8
9
10
11
12
There are 31 section headers, starting at offset 0x1b18: Section Headers: [Nr] Name Type Address Offset Size EntSize Flags Link Info Align [ 0] NULL 0000000000000000 00000000 0000000000000000 0000000000000000 0 0 0 [ 1] .interp PROGBITS 0000000000400238 00000238 000000000000001c 0000000000000000 A 0 0 1 [ 2] .note.ABI-tag NOTE 0000000000400254 00000254 0000000000000020 0000000000000000 A 0 0 4 ...
ELF文件的常见节
.text:代码段,包含程序的指令。.data:已初始化的全局变量和静态变量。.bss:未初始化的全局变量和静态变量。.rodata:只读数据(如字符串常量)。.symtab:符号表。.strtab:字符串表。.dynamic:动态链接信息。
DLL
DLL (动态链接库 ,Dynamic Link Library)是 Windows 操作系统中一种重要的可执行文件格式,它包含可由多个程序同时使用的代码和数据。
[!tip]
静态链接 :将库代码直接复制到每个应用程序中动态链接 :多个程序共享同一个 DLL 文件,在运行时调用
扩展名通常为 .dll
不能直接运行,需要由其他程序调用
支持代码重用和模块化开发
节省磁盘空间和内存
工作原理为:
1
2
3
应用程序 → 调用 → DLL 文件 ↑ ↓ └──── 共享功能 ───┘
生成
我们现在想要生成一个简单的计算函数:
MathFunctions.c:
1 2 3 4 5 6 7 8 9 10 11 12 13 14 15 16 17 18 19 20 21 22 23 #include "pch.h" int add (int a, int b) return a + b; } int minus (int a, int b) return a - b; } int multiply (int a, int b) return a * b; } double divide (int a, int b) double m = (double )a / b; return m; }
头文件pch.h如下:
1 2 3 4 5 6 7 8 9 10 11 12 13 14 15 16 17 18 19 20 21 22 23 24 25 26 27 28 #ifndef PCH_H #define PCH_H #define WIN32_LEAN_AND_MEAN #include <windows.h> #endif #ifdef IMPORT_DLL #define API_MODE _declspec(dllimport) #else #define API_MODE _declspec(dllexport) #endif #ifdef __cplusplus extern "C" { #endif API_MODE int add (int a, int b) ;API_MODE int minus (int a, int b) ;API_MODE int multiply (int a, int b) ;API_MODE double divide (int a, int b) ;#ifdef __cplusplus } #endif
[!tip]
__declspec(dllexport/dllimport)
dllexport:标记函数/变量需要从DLL导出dllimport:标记函数/变量需要从DLL导入
需要注意的是,这里的import指的是需要从dll导入,意思是外部在调用函数或者变量的时候需要加载dll,所以import和export是从外部函数的角度描述的。
extern "C"
防止C++编译器对函数名进行名称修饰(name mangling)
确保函数名在DLL中保持原样,便于动态加载
Vs studio
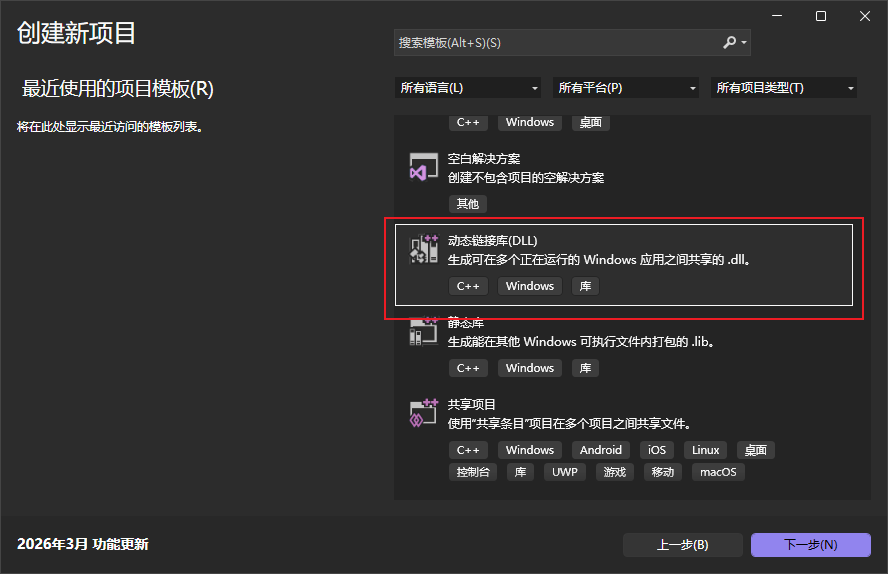
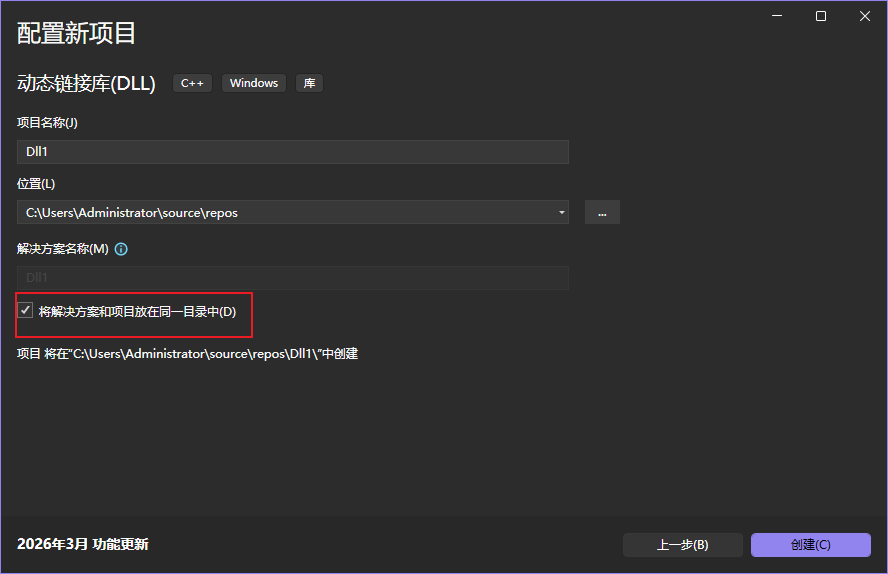
创建dll项目
注意,这里记住dll的路径,防止之后找不到,可以勾选将解决方案和项目放在同一目录下,这样就不会找不到文件了
工程目录
新建的工程目录为:
1
2
3
4
5
6
7
8
Dll1.slnx Dll1.vcxproj Dll1.vcxproj.filters Dll1.vcxproj.user dllmain.cpp framework.h pch.cpp pch.h
我们需要关注的是头文件和源文件,注意,这里如果外部想要用这个函数,在源文件中需要定义IMPORT_DLL宏
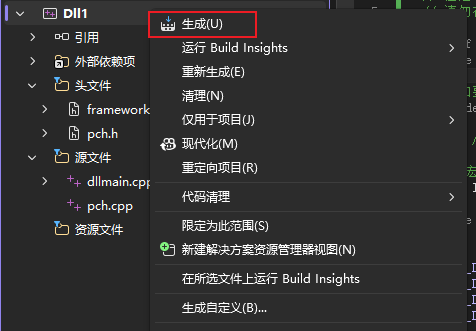
编译生成
完成代码编写之后,右键项目,点击生成即可生成dll
生成的dll文件位于Dll1\x64\Debug文件夹下。
shell
vs studio
1
2
# 使用命令行(需要安装Visual Studio开发人员命令提示符) cl /LD MathFunctions.c /FeMathFunctions.dll
Mingw
1 gcc -shared -o MathFunctions.dll MathFunctions.c -DIMPORT_DLL
这里的-DIMPORT_DLL就是增加IMPORT_DLL宏的意思
如果想要使用隐式链接,那么可能还需要生成lib文件
1 dlltool --dllname MyLibrary.dll --def MyLibrary.def --output-lib libMyLibrary.a
Linux
1
2
# 创建共享库 gcc -shared -fPIC -o libmathfunctions.so MathFunctions.c -DIMPORT_DLL
测试
显式链接
1 2 3 4 5 6 #include <windows.h> int main () HMODULE hDll = LoadLibrary ("MathFunctions.dll" ); }
运行时动态加载DLL
需要 LoadLibrary() 和 GetProcAddress()
不需要 .lib 文件
代码看起来更"手动"
我们可以使用以下代码测试我们的dll
1 2 3 4 5 6 7 8 9 10 11 12 13 14 15 16 17 18 19 20 21 22 23 24 25 26 27 28 29 30 31 32 33 34 35 36 37 38 39 40 41 42 #include <stdio.h> #include <windows.h> typedef int (*AddFunc) (int , int ) ;typedef int (*MultiplyFunc) (int , int ) ;int main () { printf ("=== 显式链接测试 ===\n" ); HMODULE hDll = LoadLibrary("MathDLL.dll" ); if (hDll == NULL ) { printf ("加载DLL失败! 错误码: %d\n" , GetLastError()); return 1 ; } printf ("DLL加载成功\n" ); AddFunc add = (AddFunc)GetProcAddress(hDll, "Add" ); MultiplyFunc multiply = (MultiplyFunc)GetProcAddress(hDll, "Multiply" ); if (add == NULL || multiply == NULL ) { printf ("获取函数地址失败! 错误码: %d\n" , GetLastError()); FreeLibrary(hDll); return 1 ; } int sum = add(10 , 20 ); int product = multiply(10 , 20 ); printf ("10 + 20 = %d\n" , sum); printf ("10 * 20 = %d\n" , product); FreeLibrary(hDll); printf ("DLL已卸载\n" ); return 0 ; }
显示链接编译命令最简单
1 gcc -o TestProgram.exe TestProgram.c
编译链接过程为:
1
2
3
4
5
6
7
8
9
10
11
12
13
14
编译时: TestExplicit.c → 编译器 → TestExplicit.obj ↓ 链接器 → TestExplicit.exe (不需要.lib文件) 运行时: 启动 TestExplicit.exe ↓ 手动 LoadLibrary("MathDLL.dll") ↓ 手动 GetProcAddress(hDll, "Add") ↓ 通过函数指针调用
隐式链接
1 2 3 4 5 6 7 #include "MathFunctions.h" #pragma comment(lib, "MathFunctions.lib" ) int main () int result = Add (10 , 5 ); printf ("%d" , result); }
编译器在编译时就确定函数地址
需要 .lib 文件(导入库)
程序启动时自动加载DLL
代码看起来就像调用普通函数
隐式链接在编译阶段就指定好了dll
1 2 3 4 5 6 7 8 9 10 11 12 13 14 15 16 17 18 19 20 #include <stdio.h> #include <windows.h> __declspec(dllimport) int Add (int a, int b) __declspec(dllimport) int Multiply (int a, int b) int main () printf ("=== 隐式链接测试 ===\n" ); int sum = Add (10 , 20 ); int product = Multiply (10 , 20 ); printf ("10 + 20 = %d\n" , sum); printf ("10 * 20 = %d\n" , product); return 0 ; }
1 gcc -o TestImplicit.exe TestImplicit.c -L. -lMathFunctions
这里的MathFunctions是lib或a文件
隐式链接编译链接的流程为:
1
2
3
4
5
6
7
8
9
编译时: TestImplicit.c → 编译器 → TestImplicit.obj ↓ MathDLL.lib(导入库) → 链接器 → TestImplicit.exe 运行时: 启动 TestImplicit.exe → 系统自动加载 MathDLL.dll ↓ 直接调用函数 Add(10, 20)